建议阅读时间: 2min
Redisson 实现分布式锁的机制如下: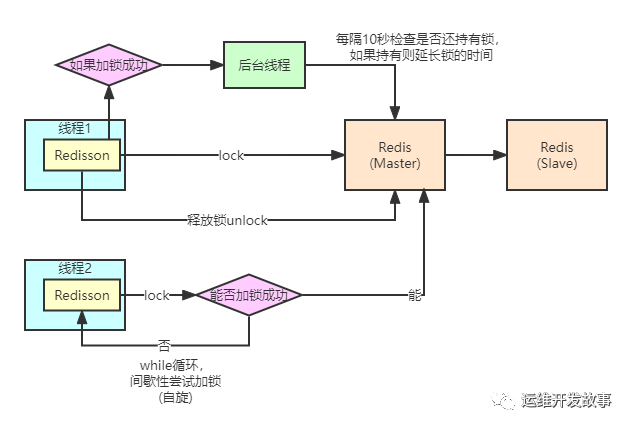
原理描述
-
先线程 1 获取锁,如果获取锁成功,那么会开启一个后台线程,每次间隔 10 秒进行续期。 -
并发情况,线程 2 会进行加锁,如果无法获取锁,那么就会进行自旋等待,等待到达一定次数过后,就会进行线程阻塞,并且订阅解锁消息。 -
当线程 1 释放锁之后,会触发 redis 的解锁消息,消息的观察者会观察到然后去唤醒解锁的逻辑,线程 2 继续竞争锁。 -
对于锁的重入,Redisson 是通过 hash 为数据类型的,会存储当前线程的 tid (本质是生成的 uuid 唯一id).
测试代码
下面我们将以一个秒杀的例子来说明:
依赖版本
implementation 'org.redisson:redisson-spring-boot-starter:3.17.0'
测试代码
下面是模拟一个商品秒杀的场景,示例代码如下:
public class RedissonTest {

    public static void main(String[] args) {
        //1. 配置部分
        Config config = new Config();
        String address = "redis://127.0.0.1:6379";
        SingleServerConfig serverConfig = config.useSingleServer();
        serverConfig.setAddress(address);
        serverConfig.setDatabase(0);
        config.setLockWatchdogTimeout(5000);
        Redisson redisson = (Redisson) Redisson.create(config);


        RLock rLock = redisson.getLock("goods:1000:1");
        //2. 加锁
        rLock.lock();
        try {
            System.out.println("todo 逻辑处理 1000000.");
        } finally {
            if (rLock.isLocked() && rLock.isHeldByCurrentThread()) {
                //3. 解锁
                rLock.unlock();
            }
        }

    }
}
加锁设计
rLock.lock();是加锁的核心代码,我们一起来看看调用栈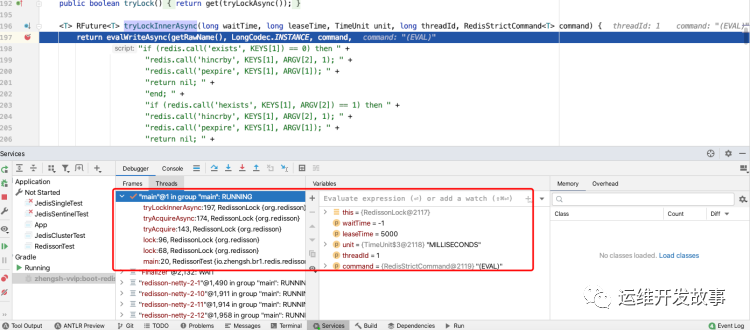 加锁的核心方法是:
org.redisson.RedissonLock#tryLockInnerAsync
<T> RFuture<T> tryLockInnerAsync(long waitTime, long leaseTime, TimeUnit unit, long threadId, RedisStrictCommand<T> command) {
        return evalWriteAsync(getRawName(), LongCodec.INSTANCE, command,
                "if (redis.call('exists', KEYS[1]) == 0) then " +
                        "redis.call('hincrby', KEYS[1], ARGV[2], 1); " +
                        "redis.call('pexpire', KEYS[1], ARGV[1]); " +
                        "return nil; " +
                        "end; " +
                        "if (redis.call('hexists', KEYS[1], ARGV[2]) == 1) then " +
                        "redis.call('hincrby', KEYS[1], ARGV[2], 1); " +
                        "redis.call('pexpire', KEYS[1], ARGV[1]); " +
                        "return nil; " +
                        "end; " +
                        "return redis.call('pttl', KEYS[1]);",
                Collections.singletonList(getRawName()), unit.toMillis(leaseTime), getLockName(threadId));
    }
其实它的本质是调用一段 LUA 脚本进行加锁, 需要注意的是这个地方使用的数据类型是 hash。这里是用 hash 的好处就是可以通过同一个 key 来存储重入的 tid
锁续期设计
锁的续期是在 org.redisson.RedissonLock#tryAcquireAsync方法中调用 scheduleExpirationRenewal实现的。
续期需要注意的是,看门狗是设置在主线程的延迟队列的线程中。
这里的好处就是如果我在一个进程中,同时加了 1000 把锁,我们不需要启动 1000 个子线程去续期,只需要创建 1000 个续期任务对象即可,在到达续期时间才会唤醒续期线程。
tryAcquireAsync 代码如下:
private <T> RFuture<Long> tryAcquireAsync(long waitTime, long leaseTime, TimeUnit unit, long threadId) {
    RFuture<Long> ttlRemainingFuture;
    if (leaseTime != -1) {
        ttlRemainingFuture = tryLockInnerAsync(waitTime, leaseTime, unit, threadId, RedisCommands.EVAL_LONG);
    } else {
        ttlRemainingFuture = tryLockInnerAsync(waitTime, internalLockLeaseTime,
                TimeUnit.MILLISECONDS, threadId, RedisCommands.EVAL_LONG);
    }

    CompletionStage<Long> f = ttlRemainingFuture.thenApply(ttlRemaining -> {
        // lock acquired
        if (ttlRemaining == null) {
            if (leaseTime != -1) {
                internalLockLeaseTime = unit.toMillis(leaseTime);
            } else {
                // 锁过期时间续期
                scheduleExpirationRenewal(threadId);
            }
        }
        return ttlRemaining;
    });
    return new CompletableFutureWrapper<>(f);
}
锁续期 scheduleExpirationRenewal代码如下:
protected void scheduleExpirationRenewal(long threadId) {
    ExpirationEntry entry = new ExpirationEntry();
    ExpirationEntry oldEntry = EXPIRATION_RENEWAL_MAP.putIfAbsent(getEntryName(), entry);
    if (oldEntry != null) {
        oldEntry.addThreadId(threadId);
    } else {
        entry.addThreadId(threadId);
        try {
            renewExpiration();
        } finally {
            if (Thread.currentThread().isInterrupted()) {
                cancelExpirationRenewal(threadId);
            }
        }
    }
}
然后在调用 renewExpiration(); 执行续期逻辑, 其实这里是一个定时任务 + 递归的方式实现续期的,用定时任务的好处就是不用去开 N 个字线程,只需要创建对应的任务对象即可。
备注:如果超级极端的情况下 N 把锁,同时加锁,同时需求。我们可以考虑在锁的有效期上,给它加一个浮动时间比如 100 - 500ms. 这样就能一定程度上避免 (参考的是缓存失效/击穿的解决方案)
private void renewExpiration() {
    ExpirationEntry ee = EXPIRATION_RENEWAL_MAP.get(getEntryName());
    if (ee == null) {
        return;
    }

    // 创建延迟任务
    Timeout task = commandExecutor.getConnectionManager().newTimeout(new TimerTask() {
        @Override
        public void run(Timeout timeout) throws Exception {
            ExpirationEntry ent = EXPIRATION_RENEWAL_MAP.get(getEntryName());
            if (ent == null) {
                return;
            }
            Long threadId = ent.getFirstThreadId();
            if (threadId == null) {
                return;
            }

            // 真正的续期,调用 LUA 脚本续期
            RFuture<Boolean> future = renewExpirationAsync(threadId);
            future.whenComplete((res, e) -> {
                if (e != null) {
                    log.error("Can't update lock " + getRawName() + " expiration", e);
                    EXPIRATION_RENEWAL_MAP.remove(getEntryName());
                    return;
                }

                // 如果续期成功
                if (res) {
                    // reschedule itself
                    renewExpiration();
                } else {
                    cancelExpirationRenewal(null);
                }
            });
        }
    }, internalLockLeaseTime / 3, TimeUnit.MILLISECONDS);

    ee.setTimeout(task);
}
这里还有一个小的点,就是续期的时间是 1/3 为什么呢?保证在下次续期的时候锁不过期,如果是 1/2 可能在下次定时任务执行的时候 key 已经过期,如果小于 1/3 会导致频繁续期,任务代价/收益比不高。
renewExpirationAsync方法, 里面还是一段 LUA 脚本,进行重新设置锁的过期时间。
    protected RFuture<Boolean> renewExpirationAsync(long threadId) {
        return evalWriteAsync(getRawName(), LongCodec.INSTANCE, RedisCommands.EVAL_BOOLEAN,
                "if (redis.call('hexists', KEYS[1], ARGV[2]) == 1) then " +
                        "redis.call('pexpire', KEYS[1], ARGV[1]); " +
                        "return 1; " +
                        "end; " +
                        "return 0;",
                Collections.singletonList(getRawName()),
                internalLockLeaseTime, getLockName(threadId));
    }
锁的自旋重试
org.redisson.RedissonLock#lock(long, java.util.concurrent.TimeUnit, boolean)在执行获取锁失败的时候,会进入重试。其实这里就会执行 18 行以后的 while (true)逻辑
private void lock(long leaseTime, TimeUnit unit, boolean interruptibly) throws InterruptedException {
    long threadId = Thread.currentThread().getId();
    Long ttl = tryAcquire(-1, leaseTime, unit, threadId);
    // lock acquired
    if (ttl == null) {
        return;
    }

    // 订阅锁过期的消息
    CompletableFuture<RedissonLockEntry> future = subscribe(threadId);
    RedissonLockEntry entry;
    if (interruptibly) {
        entry = commandExecutor.getInterrupted(future);
    } else {
        entry = commandExecutor.get(future);
    }

    try {
        while (true) {
            ttl = tryAcquire(-1, leaseTime, unit, threadId);
            // lock acquired
            if (ttl == null) {
                break;
            }

            // waiting for message
            if (ttl >= 0) {
                try {
                    // 阻塞锁的超时时间,等锁过期后再尝试加锁
                    entry.getLatch().tryAcquire(ttl, TimeUnit.MILLISECONDS);
                } catch (InterruptedException e) {
                    if (interruptibly) {
                        throw e;
                    }
                    entry.getLatch().tryAcquire(ttl, TimeUnit.MILLISECONDS);
                }
            } else {
                if (interruptibly) {
                    entry.getLatch().acquire();
                } else {
                    entry.getLatch().acquireUninterruptibly();
                }
            }
        }
    } finally {
        unsubscribe(entry, threadId);
    }
//        get(lockAsync(leaseTime, unit));
}
entry.getLatch().tryAcquire(ttl, TimeUnit.MILLISECONDS);其实这里就是一个间歇性自旋。等到上次锁过期的时间,在唤醒进行抢锁 entry.getLatch().acquire();
订阅锁失效
还有一个逻辑就是
CompletableFuture future = subscribe(threadId);
这里其实是会订阅一个消息,如果解锁过后,会发布解锁的消息。然后再唤醒当前多次竞争锁进入休眠的线程。
解锁设计
rLock.unlock(); 的核心就是释放锁,撤销续期和唤醒在等待加锁的线程(发布解锁成功消息)。
核心方法(解锁): org.redisson.RedissonLock#unlockInnerAsync
protected RFuture<Boolean> unlockInnerAsync(long threadId) {
        return evalWriteAsync(getRawName(), LongCodec.INSTANCE, RedisCommands.EVAL_BOOLEAN,
                "if (redis.call('hexists', KEYS[1], ARGV[3]) == 0) then " +
                        "return nil;" +
                        "end; " +
                        "local counter = redis.call('hincrby', KEYS[1], ARGV[3], -1); " +
                        "if (counter > 0) then " +
                        "redis.call('pexpire', KEYS[1], ARGV[2]); " +
                        "return 0; " +
                        "else " +
                        "redis.call('del', KEYS[1]); " +
                        // 发布解锁成功消息
                        "redis.call('publish', KEYS[2], ARGV[1]); " +
                        "return 1; " +
                        "end; " +
                        "return nil;",
                Arrays.asList(getRawName(), getChannelName()), LockPubSub.UNLOCK_MESSAGE, internalLockLeaseTime, getLockName(threadId));
    }
还是 LUA 的执行方式。
撤销锁续期
核心方法 org.redisson.RedissonBaseLock#unlockAsync(long)
@Override
public RFuture<Void> unlockAsync(long threadId) {
    // 解锁
    RFuture<Boolean> future = unlockInnerAsync(threadId);

    // 撤销续期
    CompletionStage<Void> f = future.handle((opStatus, e) -> {
        cancelExpirationRenewal(threadId);

        if (e != null) {
            throw new CompletionException(e);
        }
        if (opStatus == null) {
            IllegalMonitorStateException cause = new IllegalMonitorStateException("attempt to unlock lock, not locked by current thread by node id: "
                    + id + " thread-id: " + threadId);
            throw new CompletionException(cause);
        }

        return null;
    });

    return new CompletableFutureWrapper<>(f);
}
解锁成功唤排队线程
在 org.redisson.pubsub.LockPubSub#onMessage中回去唤醒阻塞的线程,让执行前面的锁自旋逻辑,具体代码如下:
@Override
protected void onMessage(RedissonLockEntry value, Long message) {
    if (message.equals(UNLOCK_MESSAGE)) {
        Runnable runnableToExecute = value.getListeners().poll();
        if (runnableToExecute != null) {
            runnableToExecute.run();
        }

        value.getLatch().release();
    } else if (message.equals(READ_UNLOCK_MESSAGE)) {
        while (true) {
            Runnable runnableToExecute = value.getListeners().poll();
            if (runnableToExecute == null) {
                break;
            }
            runnableToExecute.run();
        }

        value.getLatch().release(value.getLatch().getQueueLength());
    }
}
公众号:运维开发故事
github:https://github.com/orgs/sunsharing-note/dashboard
爱生活,爱运维
如果你觉得文章还不错,就请点击右上角选择发送给朋友或者转发到朋友圈。您的支持和鼓励是我最大的动力。喜欢就请关注我吧~

扫码二维码
关注我,不定期维护优质内容
温馨提示
如果你喜欢本文,请分享到朋友圈,想要获得更多信息,请关注我。
........................