线程池动态拓容
创建线程池
<pre auto="" border-box="" border-radius:="" box-shadow:="" consolas="" courier="" font-family:="" font-size:="" margin-bottom:="" margin-top:="" menlo="" mono="" monospace="" overflow:="" rgba="" sfmono-regular="" style="box-sizing:" visibility:="" visible="">```
ThreadPoolExecutor taskExecutor = <span border-box="" color:="" line-height:="" rgb="" style="box-sizing:" visibility:="" visible="">new</span> ThreadPoolExecutor(<span border-box="" color:="" line-height:="" rgb="" style="box-sizing:" visibility:="" visible="">8</span>, <span border-box="" color:="" line-height:="" rgb="" style="box-sizing:" visibility:="" visible="">64</span>, <span border-box="" color:="" line-height:="" rgb="" style="box-sizing:" visibility:="" visible="">5</span>, TimeUnit.SECONDS, <span border-box="" color:="" line-height:="" rgb="" style="box-sizing:" visibility:="" visible="">new</span> LinkedBlockingQueue<>(<span border-box="" color:="" line-height:="" rgb="" style="box-sizing:" visibility:="" visible="">256</span>), <span border-box="" color:="" line-height:="" rgb="" style="box-sizing:" visibility:="" visible="">new</span> ThreadFactoryBuilder().setNameFormat(<span border-box="" color:="" line-height:="" rgb="" style="box-sizing:" visibility:="" visible="">customer-worker-%d</span>).build(), (task, executor) -> {<br border-box="" style="box-sizing:" visibility:="" visible=""></br>    <span border-box="" color:="" line-height:="" rgb="" style="box-sizing:" visibility:="" visible="">try</span> {<br border-box="" style="box-sizing:" visibility:="" visible=""></br>        executor.getQueue().put(task);<br border-box="" style="box-sizing:" visibility:="" visible=""></br>    } <span border-box="" color:="" line-height:="" rgb="" style="box-sizing:" visibility:="" visible="">catch</span> (InterruptedException e) {<br border-box="" style="box-sizing:" visibility:="" visible=""></br>        logger.error(<span border-box="" color:="" line-height:="" rgb="" style="box-sizing:" visibility:="" visible="">customer-worker 线程阻断异常:</span> + e.getMessage(), e);<br border-box="" style="box-sizing:" visibility:="" visible=""></br>    }<br border-box="" style="box-sizing:" visibility:="" visible=""></br>});<br border-box="" style="box-sizing:" visibility:="" visible=""></br>
动态拓展容量 触发方式,我们可以通过 apollo 配置或者通过延迟任务定期扫描自动拓展
```
// 配置信息
@Value(${corePoolSize:2})
private Integer corePoolSize;
@Value(${corePoolSize:8})
private Integer maximumPoolSize;
// 修改线程池核心参数,提高并发度
taskExecutor.setCorePoolSize(corePoolSize);
taskExecutor.setMaximumPoolSize(maximumPoolSize);
```
```可以通过这种方式对生产环境线程池参数进行动态优化。
# 判断线程池执行结束
线程池的使用可以提高我们并发程序线程复用,以及提供对线程的管理能力。提高线程的利用率,提升性能。但是对于一些场景我们需要知道当前线程池中提交的任务是否执行完毕,我们可以通过一下4种方式判断。
## 使用 isTerminated 方法
threadPool.isTerminated() 常用来判断线程池是否结束,结束了为TRUE. 使用 threadPool.isTerminated() 方法,必须在shutdown()方法关闭线程池之后才能使用,否则isTerminated()永不为TRUE,线程将一直阻塞在该判断的地方,导致程序最终崩溃。
```
```
/**
* 线程池任务执行完成判断
*/
public class ThreadPoolCompleted {
public static void main(String[] args) {
// 1.创建线程池
ThreadPoolExecutor threadPool = new ThreadPoolExecutor(10, 20,
0, TimeUnit.SECONDS, new LinkedBlockingDeque<>(1024));
// 2.添加任务
addTask(threadPool);
// 3.判断线程池是否执行完
isCompleted(threadPool); // 【核心调用方法】
// 4.线程池执行完
System.out.println();
System.out.println(线程池任务执行完成!);
}
/**
* 方法1:isTerminated 实现方式
* 判断线程池的所有任务是否执行完
*/
private static void isCompleted(ThreadPoolExecutor threadPool) {
threadPool.shutdown();
while (!threadPool.isTerminated()) { // 如果没有执行完就一直循环
}
}
/**
* 给线程池添加任务
*/
private static void addTask(ThreadPoolExecutor threadPool) {
// 任务总数
final int taskCount = 5;
// 添加任务
for (int i = 0; i < taskCount; i++) {
final int finalI = i;
threadPool.submit(new Runnable() {
@Override
public void run() {
try {
// 随机休眠 0-4s
int sleepTime = new Random().nextInt(5);
TimeUnit.SECONDS.sleep(sleepTime);
} catch (InterruptedException e) {
e.printStackTrace();
}
System.out.println(String.format(任务%d执行完成, finalI));
}
});
}
}
}
```
```## 使用 getCompletedTaskCount 方法
我们可以通过判断线程池中的计划执行任务数和已完成任务数,来判断线程池是否已经全部执行完,如果计划执行任务数=已完成任务数,那么线程池的任务就全部执行完了,否则就未执行完。
```
```
/**
* 方法2:getCompletedTaskCount 实现方式
* 判断线程池的所有任务是否执行完
*/
private static void isCompletedByTaskCount(ThreadPoolExecutor threadPool) {
while (threadPool.getTaskCount() != threadPool.getCompletedTaskCount()) {
}
}
```
```方法解析:
- getTaskCount():返回计划执行的任务总数。由于任务和线程的状态可能在计算过程中动态变化,因此返回的值只是一个近似值。
- getCompletedTaskCount():返回完成执行任务的总数。因为任务和线程的状态可能在计算过程中动态地改变,所以返回的值只是一个近似值,但是在连续的调用中并不会减少。PS: 此实现方法的**优点是无需关闭线程池**。 它的**缺点是getTaskCount() 和getCompletedTaskCount(),返回的是一个近似值**,因为线程池中的任务和线程的状态可能在计算过程中动态变化,所以它们两个返回的都是一个近似值。
## 使用 CountDownLatch
CountDownLatch 是一个栅栏类似计数器,我们创建了一个包含 N 个任务的计数器,每个任务执行完计数器 -1,直到计数器减为 0 时,说明所有的任务都执行完了
```
```
//创建线程池
ThreadPoolExecutor threadPool = new ThreadPoolExecutor(10, 20,
0, TimeUnit.SECONDS, new LinkedBlockingDeque<>(1024));
CountDownLatch countDownLatch = new CountDownLatch(2);
for (int i = 0; i < 10; i++) {
int finalI = i;
threadPool.submit(() -> {
try {
// 随机休眠 0-4s
int sleepTime = new Random().nextInt(5);
TimeUnit.SECONDS.sleep(Math.max(sleepTime, 2));
} catch (InterruptedException e) {
System.err.println(InterruptedException err : + e.getMessage());
}
System.out.println(gettime() + task running : + finalI);
countDownLatch.countDown(); // 每次计数器-1
});
}
try {
countDownLatch.await(); // 等待所有的任务执行完毕
} catch (InterruptedException t) {
System.err.println(InterruptedException err : + t.getMessage());
}
```
```CountDownLatch 写法很优雅,且无需关闭线程池,但它的缺点是只能使用一次,CountDownLatch创建之后不能被重复使用,也就是说 CountDownLatch 可以理解为只能使用一次的计数器。
## 使用 CyclicBarrier
CyclicBarrier 和 CountDownLatch 类似,它可以理解为一个可以重复使用的循环计数器,CyclicBarrier 可以调用 reset 方法将自己重置到初始状态,CyclicBarrier 具体实现代码如下:
```
```
// 创建线程池
ThreadPoolExecutor threadPool = new ThreadPoolExecutor(10, 20,
0, TimeUnit.SECONDS, new LinkedBlockingDeque<>(1024));
final int taskCount = 5; // 任务总数
// 循环计数器
CyclicBarrier cyclicBarrier = new CyclicBarrier(taskCount, new Runnable() {
@Override
public void run() {
// 线程池执行完
System.out.println();
System.out.println(线程池所有任务已执行完!);
}
});
// 添加任务
for (int i = 0; i < taskCount; i++) {
final int finalI = i;
threadPool.submit(new Runnable() {
@Override
public void run() {
try {
// 随机休眠 0-4s
int sleepTime = new Random().nextInt(5);
TimeUnit.SECONDS.sleep(sleepTime);
System.out.println(String.format(任务%d执行完成, finalI));
// 线程执行完
cyclicBarrier.await();
} catch (InterruptedException e) {
e.printStackTrace();
} catch (BrokenBarrierException e) {
e.printStackTrace();
}
}
});
}
```
```执行结果:
**CyclicBarrier 构造方法核心参数: **
- parties 计数器的数量 ,
- barrierAction� 计数器为 0 时,也就是任务都执行完之后可以执行的事件(方法)。**await 方法:** 在 CyclicBarrier 上进行阻塞等待,当调用此方法时 CyclicBarrier 的内部计数器会 -1,直到发生以下情形之一: 在 CyclicBarrier 上等待的线程数量达到 parties,也就是计数器的声明数量时,则所有线程被释放,继续执行。 当前线程被中断,则抛出 InterruptedException 异常,并停止等待,继续执行。 其他等待的线程被中断,则当前线程抛出 BrokenBarrierException 异常,并停止等待,继续执行。 其他等待的线程超时,则当前线程抛出 BrokenBarrierException 异常,并停止等待,继续执行。 其他线程调用 CyclicBarrier.reset() 方法,则当前线程抛出 BrokenBarrierException 异常,并停止等待,继续执行。
**reset 方法:** 使得CyclicBarrier回归初始状态,直观来看它做了两件事: 如果有正在等待的线程,则会抛出 BrokenBarrierException 异常,且这些线程停止等待,继续执行。 将是否破损标志位 broken 置为 false。 **优缺点分析** CyclicBarrier 从设计的复杂度到使用的复杂度都高于 CountDownLatch,相比于 CountDownLatch 来说它的优点是可以重复使用(只需调用 reset 就能恢复到初始状态),缺点是使用难度较高。
## 4 种方法总结:
1. 使用 isTerminated 方法判断:通过判断线程池的完成状态来实现,需要关闭线程池,一般情况下不建议使用。
2. 使用 getCompletedTaskCount 方法判断:通过计划执行总任务量和已经完成总任务量,来判断线程池的任务是否已经全部执行,如果相等则判定为全部执行完成。但因为线程个体和状态都会发生改变,所以得到的是一个大致的值,可能不准确。
3. 使用 CountDownLatch 判断:相当于一个线程安全的单次计数器,使用比较简单,且不需要关闭线程池,是比较常用的判断方法。
4. 使用 CyclicBarrier 判断:相当于一个线程安全的重复计数器,但使用较为复杂,所以日常项目中使用的较少。# 线程池提交速度限制
对于线程池提交速率限制,我们可以通过信号量进行限制,这样可以避免触发线程池的拒绝策略,将逻辑处理能力限制功能前置,可以做到线程池的职责单一,负责提交而去做额外的事情。 下面是一个简单的例子:
```
```
// 创建线程池
ThreadPoolExecutor threadPool = new ThreadPoolExecutor(10, 20,
0, TimeUnit.SECONDS, new LinkedBlockingDeque<>(1024));
final int taskCount = 5; // 任务总数
// 循环计数器
Semaphore semaphore = new Semaphore(2);
// 添加任务
for (int i = 0; i < taskCount; i++) {
final int finalI = i;
threadPool.submit(new Runnable() {
@Override
public void run() {
try {
// 获取信号量
semaphore.acquire();
// 随机休眠 4s
TimeUnit.SECONDS.sleep(4);
SimpleDateFormat sdf = new SimpleDateFormat(yyyy-MM-dd HH:mm:ss);
String format1 = sdf.format(new Date());
System.out.println(String.format(%s 任务%d执行完成, format1, finalI));
} catch (InterruptedException e) {
e.printStackTrace();
} finally {
semaphore.release();
}
}
});
}
```
```执行结果: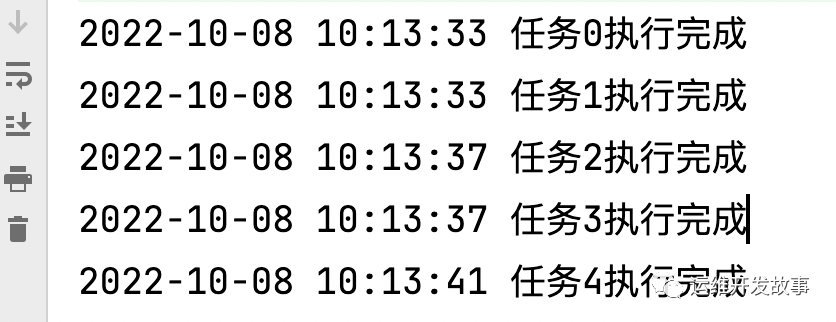我们可以看到,我们同一个时间只能获取两个信号量,也就是两个线程能进行执行,如果新进入线程调用 `semaphore.acquire();`方法进入线程阻塞,需要等待有信号量释放过后才能进入新的调用。释放方法 `semaphore.release();`.
# 延迟任务执行
Java 单机延迟任务我们可以通过, Delayed + DelayQueue� 实现:
## 实现 Delayed 接口
实现 Delayed 接口 ,自定义消息体/延迟任务对象
- activeTime 是延迟任务到期时间,单位 ms
- data 是一个业务实体,泛型结构,我们可以自定义结构体,或者类型。```
```
public class DelayMessage<T> implements Delayed {
/**
* 到期时间 单位:ms
*/
private long activeTime;
/**
* 业务实体
*/
private T data;
public DelayMessage(long activeTime, T data) {
// 将传入的时间转换为超时的时刻
this.activeTime = TimeUnit.NANOSECONDS.convert(activeTime, TimeUnit.MILLISECONDS)
+ System.nanoTime();
this.data = data;
}
public long getActiveTime() {
return activeTime;
}
public T getData() {
return data;
}
/**
* 按照剩余时间进行排序
*
* @param o
* @return
*/
@Override
public int compareTo(Delayed o) {
// 订单剩余时间-当前传入的时间= 实际剩余时间(单位纳秒)
long d = getDelay(TimeUnit.NANOSECONDS) - o.getDelay(TimeUnit.NANOSECONDS);
// 根据剩余时间判断等于0 返回1 不等于0
// 有可能大于0 有可能小于0 大于0返回1 小于返回-1
return (d == 0) ? 0 : ((d > 0) ? 1 : -1);
}
/**
* 获取剩余时间
*
* @param unit
* @return
*/
@Override
public long getDelay(TimeUnit unit) {
// 剩余时间= 到期时间-当前系统时间,系统一般是纳秒级的,所以这里做一次转换
return unit.convert(activeTime - System.nanoTime(), TimeUnit.NANOSECONDS);
}
}
```
```## 创建任务任务执行方法
创建任务执行线程、方法,去调用 `delayQueue`获取延迟任务对象。 通常情况下我们可以定义一个独立的线程去处理这些任务。
```
```
/**
* 延时任务执行线程
*/
private void executeThread() {
while (true) {
DelayMessage